Sunday, November 10, 2013

Using Couchbase NoSQL Database as a caching layer for our BizTalk Processes - Part 1

Case scenario at work: 
We needed a caching system in order to save some key-value information for our BizTalk processes, which are SOA-based. (BizTalk processes are getting configuration during Run Time).

Cache should:
1. Hold a SQL table which contains that information, and use polling for refresh. 
2. We need to control when and which table gets refreshed.

The previous solution of the cache problem was an old, "home-made" windows service component.


Reload without any cache downtime


Our cache needs to be accessible during the refresh process. That means we can't remove/flush all keys and reload them because it will cause a cache downtime. 

Instead, here are the steps to perform a reload:

1. Removed keys - Iterate each key on the cache and a check whether it still exists in that SQL table. If it doesn't - remove it from cache. 

2. Update old keys & Insert new keys - Iterate each key on the SQL table and update it on the cache layer.


How Couchbase Server is a good fit for a cache solution ?

What is Couchbase Server? 
Couchbase NoSQL is both a key-value store and a document database (documents are saved in JSON format).
NoSQL solutions are suitable for high-performance, and it's generally faster than relational database.
Couchbase also have client providers for many platforms: .NET, JAVA, C etc.
If you want to read more about Couchbase features:

Back to the cache subject, if you are using multiple servers to serve data, Couchbase replicates it across those nodes. If one node goes down, other node contains the requested data in disk - and will load it to memory. Each Couchbase client holds a cluster map, so each knows which node currently holds the requested data in memory, and therefore knows where to send the request.

As written in Couchbase site:
"Read and write operations first go to the in-memory object-managed cache – if a document being read is not in the cache, it is fetched from disk. Updates to documents are first made in the in-memory cache and later eventually persisted to disk."

In our scenario, we just need to write a windows service which read keys & values from SQL and loads them to Couchbase (which is the cache itself).
Both BizTalk servers would run on two different couchbase cluster, and data gets replicated from one to another (uni-directional replication).


Why not just use memcached ?


Memcached is a distributed memory object caching system, which appeared to be the perfect solution for our cache. Looking at our reload process - iterating each key in memcached is not possible.

The good news is that Couchbase database is built over memcached. 
It has the memcached performance with more important features that Couchbase database provides.

With Couchbase you also get a nice administration site for monitoring and configuring the server. This site also contains our loaded documents in cache and information regard them.

You can read more about the advantages over memcached cache tier here:
http://www.couchbase.com/memcached


Installing Couchbase Server


1. Download Couchbase Server for Windows - http://www.couchbase.com/download and install it:


2. Click on the "Couchbase Console" icon on your desktop and you'll get:


3. Start new cluster by:


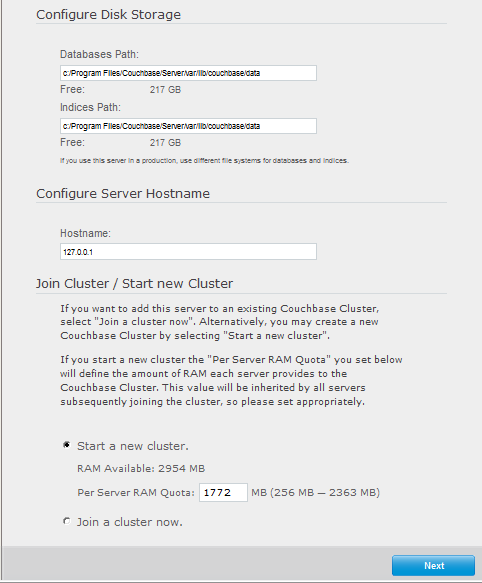
4. If you wish, you can have some samples to get started:


5. In that step, choose Couchbase bucket over Memcached bucket.
That would enable you to use map/reduce functions (e.g in order to receive all keys), and will also allow you to view documents. 
Persistence and Replication is also enabled in Couchbase bucket.

You can also choose the number of replicas (for each document) on disk. 

The replication process takes place between servers in each cluster, and also between servers across cluster, as shown here:


Also tick "Flush" option, which allows to delete all data from that bucket.


6. 


7. Configure user name and password for your server:


8. That's it ! Your Couchbase server is up & running. You should have been navigated to the administration console:


Download Couchbase client


Currently we are using .NET platform, so we downloaded .NET client from:
http://www.couchbase.com/communities/all-client-libraries

And followed this wonderful tutorial on how to use it in .NET applications:

What's next?


In part 2, I will get more specific about our caching tier.

Sunday, August 25, 2013

Publishing messages to BizTalk Database using WCF-NetTcp (Or any other WCF adapter)

Our BizTalk team ran into a very intresting scenario at work.

We have a clustered host in two different BizTalk environments, and we needed to receive a message via WCF, and deliver it to the relavent host's messagebox.

At first glance, we thought about writing a web-service which will publish to the messagebox, and will be hosted by the IIS.
That option wasn't good enough, because IIS should be installed on the same machine as BizTalk Server in order to interact with it (and that means we can't use clustering).

So we thought about not using the IIS for hosting, and found out that BizTalk allows you to host WCF service inside BTSNTSvc.exe (BizTalk Process).


How to do it ?


1. Create a receive location with "WCF-NetTcp" adapter, and configure a service address.
Note that this address (or service) doesn't even exist. You didn't need to actually write that WCF service.

Now you can send messages to the BizTalk message box using that service. Ofcourse, we could have used any other WCF adapter in order to achieve this functionallity.


2. Once you did the first step, and the receive location is running - you can access it by a client.
Here is the console application client I wrote, which sends a message to the WCF Service (actually to the BizTalk Message Box):

App.config


<?xml version="1.0" encoding="utf-8" ?>
<configuration>
  <system.serviceModel>
    <bindings>
      <netTcpBinding>
        <binding name="NetTcpBindingEndpoint" closeTimeout="00:01:00"
            openTimeout="00:01:00" receiveTimeout="00:10:00" sendTimeout="00:01:00"
            transactionFlow="false" transferMode="Buffered" transactionProtocol="OleTransactions"
            hostNameComparisonMode="StrongWildcard" listenBacklog="10"
            maxBufferPoolSize="524288" maxBufferSize="65536" maxConnections="10"
            maxReceivedMessageSize="65536">
          <readerQuotas maxDepth="32" maxStringContentLength="8192" maxArrayLength="16384"
              maxBytesPerRead="4096" maxNameTableCharCount="16384" />
          <reliableSession ordered="true" inactivityTimeout="00:10:00"
              enabled="false" />
          <security mode="Transport">
            <transport clientCredentialType="Windows" protectionLevel="EncryptAndSign" />
            <message clientCredentialType="Windows" />
          </security>
        </binding>
      </netTcpBinding>
    </bindings>
    <client>
      <endpoint address="net.tcp://SOMEDOMAIN.COM/MyTestService/SendToMsgBox.svc"
          binding="netTcpBinding" bindingConfiguration="NetTcpBindingEndpoint"
          contract="IService1" name="NetTcpBindingEndpoint">
        <identity>
          <dns value="localhost" />
        </identity>
      </endpoint>
    </client>
  </system.serviceModel>
</configuration>

IService.cs


using System;
using System.Collections.Generic;
using System.Linq;
using System.Text;

namespace ConsoleApplication1
{
    [System.ServiceModel.ServiceContractAttribute(ConfigurationName = "IService1", Namespace ="http://BTS.WebServices.Test/")]   
    public interface IService1
    {
        [System.ServiceModel.OperationContractAttribute(Action = "http://BTS.WebServices.Test/IService1/SendToMsgBox", ReplyAction = "http://BTS.WebServices.Test/IService1/SendToMsgBox")]
        void SendToMsgBox(System.Xml.XmlElement part);
    }
}


Service1Client.cs

using System;
using System.Collections.Generic;
using System.Linq;
using System.Text;

namespace ConsoleApplication1
{
    public class Service1Client : System.ServiceModel.ClientBase<IService1>, IService1
    {
        public Service1Client()
        {
        }

        public void SubmitRequest(System.Xml.XmlElement request)
        {
            base.Channel.SendToMsgBox(request);
        }
    }
}
Program.cs

using System;
using System.Collections.Generic;
using System.Linq;
using System.Text;
using System.Xml;

namespace ConsoleApplication1
{
    class Program
    {
        static void Main(string[] args)
        {
            Service1Client client = new Service1Client();

            System.Xml.XmlDocument xmlDoc = new System.Xml.XmlDocument();
            xmlDoc.Load(@"C:\SomeFileToSendToBizTalkMsgBox.xml");            
            client.SendToMsgBox(xmlDoc.DocumentElement);

            client.Close();

        }
    }
}

Monday, July 29, 2013

Node.JS tutorial - Create a simple chat with socket.io module - Part 3

Source Code: 

In that part we will create the chat functionallity (= Communication between the clients and the server).

Adding the chat communication functionallity


Client 
1

Add inside the body tag a script block:


<script type="text/javascript">
</script>


Client 
2Creating a client socket

socket.io uses WebSockets. That means that when a client connects to the server, the connection remains open ("Wikipedia": WebSocket is a web technology providing full-duplex communications channels over a single TCP connection).
Let's connect to the server and get a brand new socket for our client by adding:

  // our websocket
 var socket = io.connect();

Keep the userName in a global variable by adding:

 var userName;


Client 
3Writing login client logic

Let's start by implementing "onLogInLogOut()" function.
First we will take his user name from the text-box by :

userName = document.getElementById("txtUserName").value; 


And we'll check whether it's a "LogIn" or "LogOut" :


// get button text
var btnLogInLogOut = document.getElementById('btnLogInLogOut');
var txtBtnLogInLogOut = btnLogInLogOut.textContent || btnLogInLogOut.innerText;
if(txtBtnLogInLogOut == 'LogIn') {
}
else {
}

Suppose it's a LogIn, we need to inform the server that a new user has just connected.
We do it by:


// send join message
socket.emit('join', userName);

Here is the full LogIn condition, including changing "LogIn" button to a "LogOut" button after the user connected:


if(txtBtnLogInLogOut == 'LogIn') {
// send join message
socket.emit('join', userName);
btnLogInLogOut.innerText = 'LogOut';
document.getElementById('btnSendMessage').disabled = false;
}


Server
4

We need to keep the users, so we'll add an array as a global variable:

var users = {};

g. Let's define the 'join' event whenever a client connects:

io.sockets.on('connection', function (socket) {
   socket.on('join', function(userNameParam) {
   });
}

io.sockets.on('connection', function() { .. } ) - is a socket.io built-in event, and we use it to trigger each client connection.
As a result, we are getting a socket for that client, and we define the event that we have been using in the client side (remember "socket.emit('join', userName);" ?).

Here's a brief on the LogOn cycle from socket.io point of view:
User loads the page and socket is created ( "var socket = io.connect();" ).
"io.sockets.on('connection', ...)" is being triggered and all of the events definitions are save to that socket.
User clicks on the LogOn button and 'join' is being called on server ("socket.emit('join', userName);").
"socket.on('join', function(userNameParam)" is triggered due to the call.


Server
5

Add the full 'join' event:

socket.on('join', function(userNameParam) {
    socket.join('chatchannel'); // create/join a socket.io room
    users[userNameParam] = userNameParam; // save the user name in the users array
    socket.userName = userNameParam; // save the user name inside the socket
    socket.emit('firstLogin',users); // when a user login first, call 'firstLogin' only in that client socket
    socket.broadcast.to('chatchannel').emit('addConnectedUser',userNameParam); // tells everyone except that user that a new user has been connected
   io.sockets.in('chatchannel').emit('message',userNameParam, 'I am connected !'); // tells every client that the user connected
});

socket.io allows us to use a "room" functionallity. That means a few sockets can join a room, and the server can refer to that room when transferring messages (it's very easy to implement chat rooms like that, right ?).
In our chat version, we use only one room which called 'chatchannel' : 
"socket.join('chatchannel');".

Regarding the UI, if a user login we want to add all of the users to the listview, so we need a special event for it on the client side. We will call 'firstLogin' on the client by: "socket.emit('firstLogin',users);".

Now we need to inform all the connected users (clients) about that user who had just connected:
socket.broadcast.to('chatchannel').emit('addConnectedUser',userNameParam);
That will inform everyone in that room, except the brand new user (= the current socket).


Client
6

Define the 'firstLogin' event on the client, which adds all user names to the users list, and 'addConnectedUser' which adds the new user to an existing users list on a connected client.
Again, 'firstLogin' - for a brand new connected user, 'addConnectedUser' - for all of the connected users which already has a users list in their UI.

socket.on('firstLogin', function(data) {
    var ulFriends = document.getElementById('friends');
    ulFriends.innerHTML = '';
    for (i in data) {
addUserToList(ulFriends, data[i]);
   }
});
socket.on('addConnectedUser', function(data) {
    var ulFriends = document.getElementById('friends');
    addUserToList(ulFriends, data);
});
function addUserToList(ulFriends, userName) {
    var li = document.createElement('li');
    li.appendChild(document.createTextNode(userName));
   li.setAttribute('id','user-' + userName);
   ulFriends.appendChild(li);
}


Server
7.
When a user closes the chat browser tab, or press 'LogOut' we notify the chat clients, and leaving the socket.io 'chatchannel' room:

socket.on('leave', onUserDisconnected);

socket.on('disconnect', onUserDisconnected);

function onUserDisconnected() {
  delete users[socket.userName]; // removing the user from users list
  io.sockets.in('chatchannel').emit('logout',socket.userName); // call logout event on each client
  io.sockets.in('chatchannel').emit('message',socket.userName, 'I am disconnected !'); // tells every client that the user disconnected
  socket.leave('chatchannel'); // leaving socket.io 'chatchannel' room
}

Keep in mind that 'leave' is our event, and 'disconnect' is a built-in socket.io event.


Client
8.
Removing the disconnected client from the users list in each client:

socket.on('logout', function(data) {
var user = document.getElementById('user-' + data);
user.parentNode.removeChild(user);
});


Client
9.
When a user sends message, we want to notify the server:

function onSendMessageClick() {
    var messageText = document.getElementById("txtUserMessage").value;
    socket.emit('send',userName, messageText);
}


Server
10.
Sending the message to all clients:

socket.on('send', function(userName, messageText) {
  io.sockets.in('chatchannel').emit('message',userName, messageText);
});


Client
11.
Getting the message and publish it to the text area place:

socket.on('message', function(userName, messageText) {
   document.getElementById("txtUserMessage").value = '';
   var ulChat = document.getElementById('chat');
   var li = document.createElement('li');
   var userSpan = document.createElement('span');
   userSpan.style.color = 'red';
   userSpan.innerHTML = userName + ': ';
   var messageSpan = document.createElement('span');
   messageSpan.innerHTML = messageText;
   li.appendChild(userSpan);
   li.appendChild(messageSpan);
   ulChat.appendChild(li);
});


Summary

We're done! 
Now you have a nice not-fancy chat built with node.js.

Sunday, July 7, 2013

Node.JS tutorial - Create a simple chat with socket.io module - Part 2

Source Code:

In my previous post, I explained how to:
1. Install node.js environment and modules
2. Create a template application using express module
3. Install Eclipse IDE and node.js plugin

Now let's start building our chat application. PLEASE work with Google Chrome. I didn't test it on other browsers and i'm not sure about it's compitability.

First of all, I've searched for a decent CSS for chat, so I googled and found that post:
Create "stylesheets" under "public" directory and add "chat.css".

We are ready to write some code!

Creating the chat view


1. Create "chat.hjs" under "views" folder. ".hjs" extension tells the engine it's a hogan.js template.

2. At first, we'll include socket.io.js file and jquery (although I'm not sure we will be using the last).

<html>
  <head>
  <link rel='stylesheet' href='/stylesheets/chat.css' />
  </head>
  <body>
  <script src="/socket.io/socket.io.js"></script>
  <script src="http://ajax.googleapis.com/ajax/libs/jquery/1.7.1/jquery.min.js"></script>
</body>
</html>


3. Creating the view includes:

"upperPanel" - divided to two list: "chat" for the chat messages, "friends" for the chat users list.
"bottomPanel" - divided to two panels:
"messagePanel" - contains text area for the user to send messages, and a "send" button. Please note the onclick="onSendMessageClick()".
"signInPanel" - contains text box for the user to enter his chat user-name, and a "LogIn" button. Please note the onclick="onLogInLogOutClick()".

<div id="wrapper">
   <div id="upperPanel">
       <div>
           <ul id="chat">
           </ul>
       </div>
       <div>
        <ul id="friends">
        </ul>
       </div>
   </div>
   <div id="bottomPanel">
    <div id="messagePanel" style="float:left">
       <textarea id="txtUserMessage" style="resize:none;height:80px;float:left;width:800px;"></textarea>
       <input id="btnSendMessage" onclick="onSendMessageClick()" type="submit" style="width:50px;height:80px;float:right;" disabled="disabled" value="send" />
       </div>
       <div id="signInPanel" style="float:right">
        <input id="txtUserName" style="width:130px;" type="text" name="userName"/>
        <button id="btnLogInLogOut" onclick="onLogInLogOutClick()">LogIn</button>
       </div>
   </div>
</div>

Also add session id div, just in order to demonstrate hogan.js:

<div id="sessionId" style="float:right">
Session Id: {{sessionId}}
</div>

The curly buckets mention that this data would be injected from the server.


Server 
4. Server configurations and events

Let's take a break from the client-side, and move to write some node.js server code. We had just written a server call, so let's try to catch it.


A. 

Open app.js, which is the main file of our server application. This is where all starts. 
Please remove all code before you continue.


B. 

Add those module imports including socket.io on top:

var express = require('express')
  , routes = require('./routes')
  , user = require('./routes/user')
  , http = require('http')
  , path = require('path')
  , socketio = require('socket.io')  // library for realtime web applications based on WebSocket protocol


C

Create the server, and make socket.io availiable on server by:

var app = express()
, server = http.createServer(app)
, io = socketio.listen(server);


D

Add those configurations to your express application:

app.configure(function(){
    app.set('port', process.env.PORT || 3000);
    app.set('views', __dirname + '/views');
    app.set('view engine', 'hjs');
    app.use(express.favicon());
    //app.use(express.logger('dev')); // Express logger
    app.use(express.bodyParser());
    app.use(express.methodOverride());
    app.use(express.cookieParser()); // To parse cookies
    app.use(express.session({secret: '1234567D9sQWERTY'})); // To use sessions
    app.use(app.router);
    app.use(express.static(path.join(__dirname, 'public'))); 
});

You can see that we are setting the port of our server application, defining what is our view engine (hogan.js) and so on. We are doing this with app.set().
The app.use() calls pass 'middleware' functions for express to use. Each layer is essentially adding a function that specifically handles something to the flow through the middleware.
For example by adding "app.use(express.bodyParser());",  we ensure that our server handles incoming requests through the express middleware, and now parsing the body of incoming requests is part of the procedure that the app middleware takes when handling incoming requests.

Also add:

app.configure('development', function(){
    app.use(express.errorHandler());
});


That line would tell our app to use the middleware errorHandler function when running on development mode. (We can run development mode by writing: process.env.NODE_ENV='development' in our node app)

E. 

Start the server on the chosen port by adding:


server.listen(app.get('port'), function(){
console.log("Express server listening on port " + app.get('port')); 
});


F.

Now we want to configure routing for our app. 
We want our chat app to be placed at: "{URL}/chat".
Add to app.js:

require('./routes')(app);


And modify index.js to:

module.exports = function(app) {
  app.get('/', index);
  app.get('/chat',chat);
};


var index = function(req, res){
    res.render('index', { title: 'Express' });    
};


var chat = function(req, res){ 
    res.render('chat', { sessionId: req.session.id});
};

"app.get('/chat',chat);" - sends all GET requests of '/chat' to 'chat' function we have defined.
"res.render('chat', { sessionId: req.session.id});" - that line tells the engine to render 'chat.hjs' view, and to inject the user's session id.


Summary


In that part we created a basic chat view, and set some configurations to our server.
Now we are all set to create the communication between the clients and server.

Thank you Blogger, hello Medium

Hey guys, I've been writing in Blogger for almost 10 years this is a time to move on. I'm happy to announce my new blog at Med...