Showing posts with label tibco. Show all posts

Wednesday, January 11, 2017

Continuous Integration – TIBCO BW & Jenkins and TFS

As mentioned in my previous posts, my team worked on a big project – migrate organization's offline interfaces from Microsoft Biztalk to TIBCO BW.
We decided to configure continuous integration using Jenkins in order to short and automate development process.

Main goal was:
A developer checks-in TIBCO BW project → Jenkins triggers the check-in → Validate project by "validateproject.exe" tool →Build a project ear file (used for deployment) by "buildear.exe" tool → Deploy project to development domain by "AppManage.exe" tool

First step – Install and Configure Jenkins

  1. Next thing is to log in with "admin" user name (Initial pass stored in: Jenkins\secrets\initialAdminPassword).

  1. From the left menu choose: Manage Jenkins Manage Plugins
Please Install: Team Foundation Server Plug In, PowerShell Plug In
(You might need to install all their dependencies before).

  1. From the left menu choose: Manage Jenkins Configure System
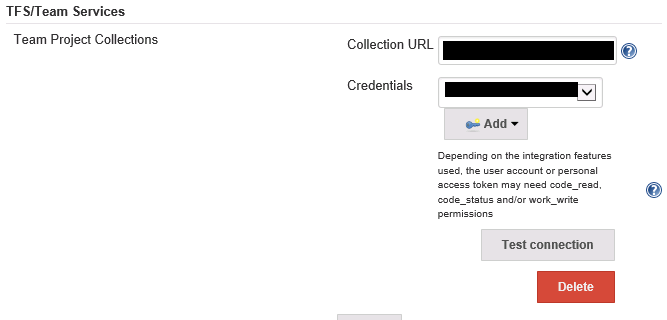
  1. Set TFS URL with relevant credentials. Test connection when done:


  1. Set Jenkins location and System Admin e-mail address. This address would appear in e-mail notifications as "From":

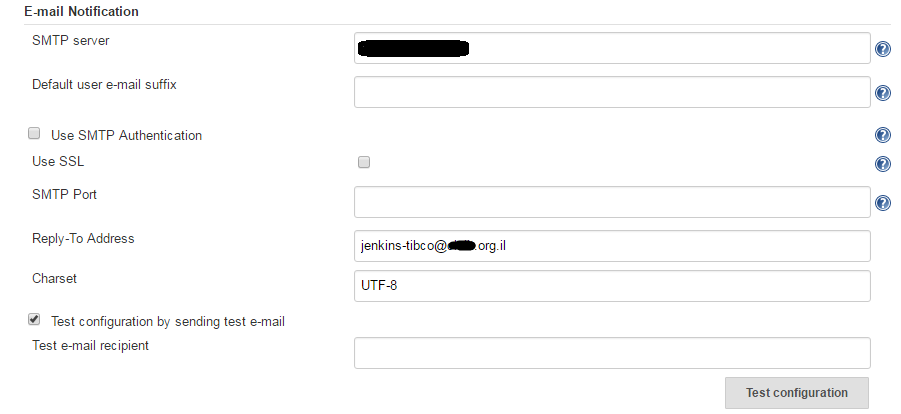
  1. Set SMTP Server and try to send a test e-mail:
Second step – Configure new items
  1. Click on Jenkins logo on top-left:

In this screen you would see all items configured (currently none).

  1. Choose from the left menu New Item.
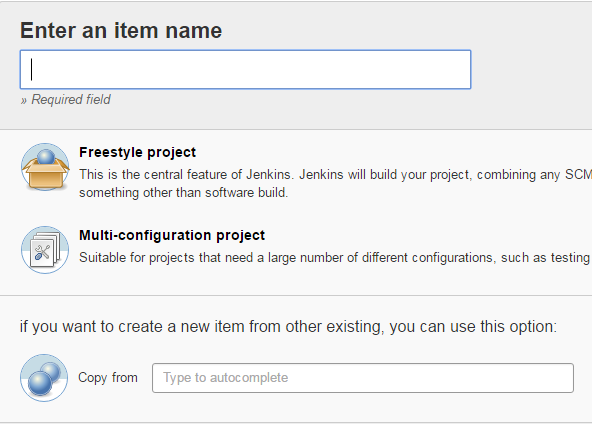
Type the item's name and choose Freestyle project.
It's also possible to create an exact copy from an existing item and after just modify configurations. This is VERY useful if you create many items which has almost the same configurations.
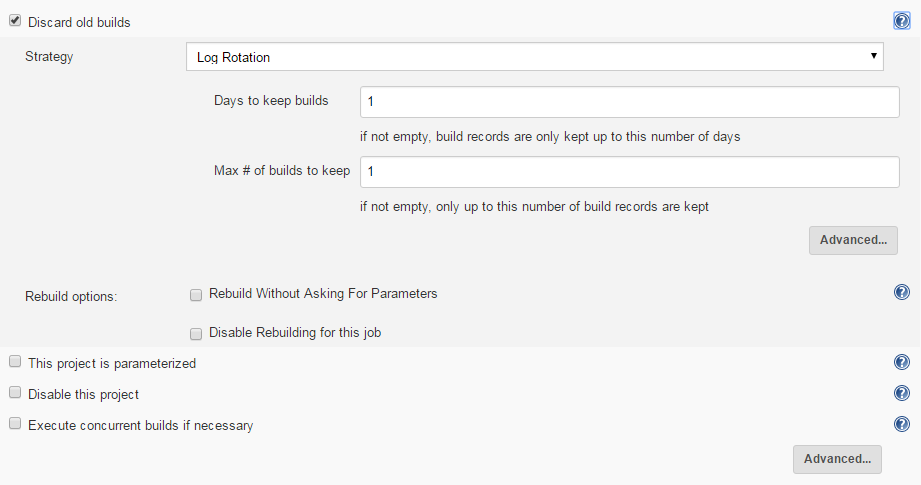
  1. In the item config screen you might want to check "Discard Old Builds" in order to keep just relevant content and to not overload storage.
  1. Next thing is to configure which project the item would monitor.
Type Collection URL and path to project (starts with "$" sign. For instance: $/Development/Test_Project):
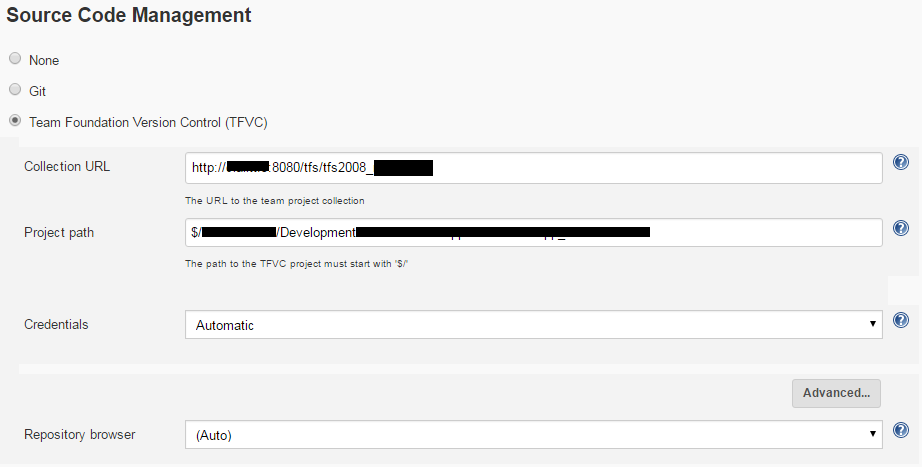

  1. It's possible to define many build triggers. We needed a simple trigger: once a developer checks-in a project.
Best way to achieve it is to mark: "Build when a changed is pushed to TFS/Team Services". Unfortunately, this option would work only since TFS 2015.
We picked "Poll SCM" and typed "H/5 * * * *" (poll for change every 5 minutes).

  1. Next is configuring build steps. You can add as many as you wish.
In this tutorial we would have 3 build steps for a tibco project:
  1. Validate project
  2. Create an ear file for deployment
  3. Deploy
  1. It's possible to configure many post-build actions. We just used the E-Mail notification to the team's mail:


Third step – Writing the build scripts: Validate, Build Ear, Deploy Ear

Tibco 5.13 offers 3 executables:
Validate project:
C:\tibco\designer\5.10\bin\validateproject.exe [arguments]

Build .ear file:
C:\tibco\tra\5.10\bin\buildear.exe [arguments]

Deploy .ear file:
C:\tibco\tra\5.10\bin\AppManage –upload –ear [arguments]

Each one produces an output which we needed to analyze with regex.
It's impossible to get only regex matches using Command-Line so we had to use PowerShell.

Project configuration would look like:


Build Step 1: Validate project
We've added a path to a powershell script in order to validate a project:
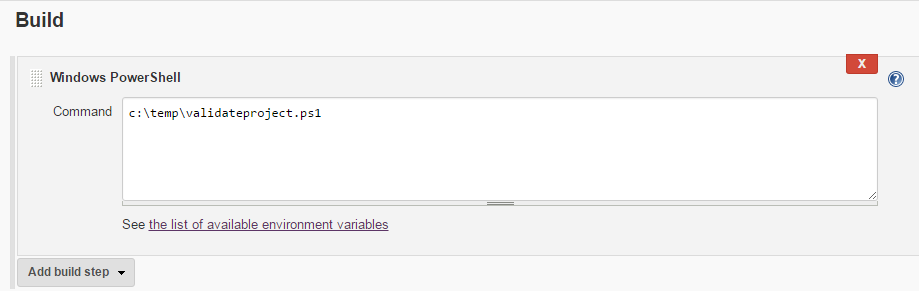
It's a good practice to keep the script in a file. This file is shared across all projects and any change in it would affect all immediately.
Let's take a look on this script content (please note the remarks):
# Sets current location to "validateproject.exe" folder
Set-Location "C:\tibco\designer\5.10\bin"

# Executes validateproject
# VERY IMPORTANT –  "-a" sets the alias library references. It's crucial for the #validation process
$tmp = .\validateproject.exe -a "C:\TibcoData\properties\FileAlias.properties" $ENV:WORKSPACE

# write output to console just for tracing
echo $tmp;

# This regex filters the number of errors
$regex = '[0-9]+ errors'
$output = select-string -InputObject $tmp -Pattern $regex -AllMatches | % {  $_.Matches } | % { $_.Value } | Out-String

# If regex output is NOT "0 errors" (that means that validation process has errors)
if($output -NotMatch "0 errors")
{
# exit code 10 (If it's not 0, then Jenkins would fail the build)
exit 10
}

Build Step 2: Build project ear file
Second step is to build project ear file which will be used for deployment in the next step.

# Sets current location to "buildear.exe" folder
Set-Location "C:\Tibco\tra\5.10\bin"

# Executes BuildEar
$tmp = .\buildear -a "C:\TibcoData\properties\FileAlias.properties" -x -v -s -ear ""/Deploy/$ENV:JOB_NAME.archive""  -o ""C:\TibcoData\ears\deployment\Jenkins\$ENV:JOB_NAME.ear"" -p ""$ENV:WORKSPACE""

# write output to console just for tracing
echo $tmp;

# Checks if "Ear created in:" (until line break) string is inside $tmp (output of buildear)
$regex = 'Ear created in:.*'
$output = select-string -InputObject $tmp -Pattern $regex -AllMatches | % {  $_.Matches } | % { $_.Value } | Out-String

# If output doesn't contain "Ear created in" then fail the build (exit code 10)
if($output -notlike "Ear created in:*")
{
exit 10
}

Build Step 3: Deploy project ear file
Last step is to deploy ear file to development domain.

# Sets current location to "AppManage.exe" folder
Set-Location "C:\tibco\tra\5.10\bin"

# Deploy ear to development domain
$tmp = .\AppManage -user "admin" -pw "admin" -domain "DEV_01" -app "$ENV:JOB_NAME" -upload -ear "C:\TibcoData\ears\deployment\Jenkins\$ENV:JOB_NAME.ear"

# Write deploy output to console
echo $tmp;

# Check if deployment finished successfully
$regex = 'Finished successfully in.*'
$output = select-string -InputObject $tmp -Pattern $regex -AllMatches | % {  $_.Matches } | % { $_.Value } | Out-String

# If output doesn't contain "Finished successfully in" then fail the build (exit code 10)
if($output -notlike "Finished successfully in*")
{
exit 10
}


Monday, December 19, 2016

TIBCO Products - JMS vs. Rendezvous, Queue vs. Topic, Route vs. Bridge

Hi again,

When dealing with TIBCO products you can easily get confused by many related buzz words or methodologies.
I've decided to write a brief comprasion.


Rendezvous JMS  
Radio broadcaster Telephone Real-life example
Yes No Sending messages to all clients
No Yes Requires server
No Yes Persistence
No Yes Reliable messaging
Yes No High-Speed messaging
- Yes Clustering & Failover


Topic Queue  
Publish/Subscribe model Point-to-Point model Architecture
Multiple clients subscribe to the message Only one consumer gets the message Number of clients
No Yes Messages sent by order
No Yes Messages are processes only once
No Yes Destination is known
Yes No Consumer needs to be active
No Yes Consumer Acknowledgement


Bridge Route  
On the same server On different server Route messages to a queue
Yes  No Possible to have different type of source and destination
(For instance: queue to topic)
No Yes (Topic only) Can be transitive
  (a->b->c
means a->c)
Yes Yes (Topic only) Filters via selectors
Yes No Restart JMS server when config changes
- Single-Hop Hops allowed
bridges.conf routes.conf Config file 

Tuesday, August 30, 2016

Tips for a good ESB integration system


1. Build SOA Environment –

Share common logics around processes with exposed services.

Benefits:

Changes will be easy – If a common logic gets changed, then you would only need to deploy a service again and each process would work with the new logic.

Services logic would be shared around ALL applications – 
These days, almost every develop tool or language is able to consume a web-service. That means you can share logic easily around an organization. Use it in order to minimize duplicate code and maintenance.


2. Less-Code and Out Of The Box solutions –

More code = More complexity & maintenance. 
Use products for minimum coding, reliable solutions and support from professional vendors.


3. End-To-End Tracing –

A good BPM would always have tracing and information regarding messages being transferred in the wire.
 
Suppose message doing this route -
Application A --> Integration System --> Application B, Application C, Application D.
Make sure there's a field to identify the message in each step and each application writes to the same trace log.

Application A writes that message 12203 was created in a folder.
Integration System writes that message 12203 was taken and process started.
Integration System writes that message 12203 is now sent to Application B, Application C, Application D.
Application B writes that message 12203 was received.
etc.

Write important business and technical process data.

Many organizations use SQL Server for tracing but the innovative solution is to use ElasticSearch which includes free-text search on a huge mass of data.

Building reports for customers (based on those traces) is always a good thing because they can help with maintenance.


4. Cache layer for lookups –

Reading and writing to and from memory is faster than any I/O.

If many processes uses configurations or lookup values stored in SQL Server then consider an appropriate cache layer which uses memory to store data.

Redis & Memcached are classic for caching, but you can also use NoSQL solutions which stored data in memory first before being persisted (e.g couchbase).


5. XSLTs for Mapping -

DON'T write C#, Java or whatever language code in order to transform XML's.

Develop XML maps ONLY with XSLTs which can be reused in any integration tool which deals with XML transformation.


6. Use Stored Procedures for queries -

It's better for your application to execute stored procedure for queries, rather than sending those as text to the DB.
It's easier for a DBA to control & manage organization logic, and to avoid "BAD" queries.


7. Dynamic configuration –


Think deeply on every process configurations you should be able to modify on runtime without changing any code.

Don't exaggerate with dynamic configurations because it has a maintenance price. You do not want an interface with a huge number of configurations, if most of them are values which will be remain unchanged. 


8. Well-defined schemas –

It's important that schema nodes, elements and attributes would have real limitations (Min/Max occurs, Value types etc.).

It's possible to restrict schema field value types in many ways (int, string, regular expressions, enums etc.).

Benefits:

Data integrity – Well, that's the obvious reason. Data is more reliable on each point of entire process.

Less complexity in process
– Suppose a process need to get an e-mail address from a request message.

If schema would enforce a valid e-mail regex in that field, then there is no need
to perform this validation on process.


9. ASync web-services is better than Sync web-services –

If there is a possibility of consuming asynchronous web-service – ALWAYS prefer it over a synchronous web-service.

Synchronic method (Two-Way) would open a session, send a request, wait for a response and only then closes the session.

Asynchrony method (One-Way) would open a session, send a request and closes the session immediately without waiting for a response.

More sessions = More CPU and more memory usage on server.

Take this tip in mind especially with offline interfaces. In those kind of processes the execution doesn't has be immediate so entire interface can last longer. 


10. Avoid direct-connection between Production & Test environments –

Some organizations tend to send messages from production to test\development environments.

That's really bad because if a resource isn't available in test\development then production would be affected.


11. Identical backup environment (or clustered in an active-passive mode) –

Maintain a backup (not-activated) environment for production (an exact copy of it).

Make sure backup environment is always up to date with the latest changes of the WORKING production environment.


12. Retry mechanism when using resources –

Consider using retry mechanism on a process which uses resources (SQL, Web-Services etc.).

Take notice you can implement retry only on OFFLINE processes/ASync services (i.e. when no one waits with an open session for an answer from that service).


13. Centralized production environments -

With the major communication progress during the last few years, geographic distance is not an issue as it used to be.

Less environments = Less maintenance.

A good centralized environment contains distributed servers which share data processing.
Some integration tools like "BizTalk" includes load balancing mechanism out of the box, but if your tool doesn't - a load balancing software would help.


14. Health and performance monitor system –

Monitor & alert crucial resources which is used by processes to early identify issues. "SCOM" and "Nagios" are popular products. Use "Watcher" for elasticsearch logs.

For instance: 
If a server CPU stays on 100% for the last 30 seconds – send an e-mail. 
If files are piling up in a directory which should be empty – send an SMS.


14. Archive source messages\requests –

Gives power for an integration system to rerun messages in case process went wrong and to be self-dependent from end-to-end.


15. Persistence –

Some integration tools (like BizTalk, which is DB-based) have persistence functionality built-in as part of their engine.
Products that put an emphasis on performance doesn't have it (e.g TIBCO) but it's possible to implement persistence logic inside a process.
Analyze each process before implementing and think when persistence is necessary if everything breaks down.


16. Parallel processing –

Use parallel processing if process logic allows it but beware from over-complex.
Keep in-mind that code should be thread-safe.


Tuesday, July 19, 2016

Developing Tibco BW interfaces with Elasticsearch for trace logs – PART 2

Part 1 of this post was generally about elasticsearch. 
That part will explain how to send documents from TIBCO BW 5.13 to Elasticsearch.

Send docs from TIBCO to Elastic

There are two ways to send docs from BW to elastic:

1. Elastic REST API.
2. Elastic Java Client API (Downloaded from here: https://www.elastic.co/guide/en/elasticsearch/client/java-api/index.html).

This post will discuss the first option.
In order to create JSON docs + invoke REST easily - please install JSON & REST Plugin in tibco folder.

Create mapping and appropriate xsd 

  
Let's get back to elastic for a moment.
Open Sense and create a mapping for trace documents that will be sent from Tibco.
Please notice that there aren't any analyzed fields since each field contains single word\string:
 
POST monitors
{
  "settings": {
    "number_of_shards": 1
  },
  "mappings": {
    "monitor": {
      "properties": {
        "ProcessGroup": {
          "type": "string",
          "index": "not_analyzed"
        },
        "ProcessName": {
          "type": "string",
          "index": "not_analyzed"
        },
        "OpName": {
          "type": "string",
          "index": "not_analyzed"
        },
        "Domain": {
          "type": "string",
          "index": "not_analyzed"
        },
        "TraceType": {
          "type": "string",
          "index": "not_analyzed"
        },
        "TraceDateTime": {
          "type": "date",
          "format": "yyyy-MM-dd HH:mm:ss"
        },
        "PatientID": {
          "type": "string",
          "index": "analyzed"
        },
        "MessageDateTime": {
          "type": "string"
        },
        "ApplicationCode": {
          "type": "string",
          "index": "not_analyzed"
        },
        "SrcMessageID": {
          "type": "string",
          "index": "not_analyzed"
        },
        "ProcessID": {
          "type": "string",
          "index": "not_analyzed"
        },
        "OpID": {
          "type": "string",
          "index": "not_analyzed"
        },
        "OpParentID": {
          "type": "string",
          "index": "not_analyzed"
        },
        "HostName": {
          "type": "string",
          "index": "not_analyzed"
        }
      }
    }
  }
}


Go back to Tibco BW and create a schema which match the mapping: 

<?xml version="1.0" encoding="UTF-8"?>
<schema xmlns="http://www.w3.org/2001/XMLSchema"
     xmlns:tns="http://Integration.clalit.org.il/Schemas/TibSrv_Log"
     targetNamespace="http://Integration.clalit.org.il/Schemas/TibSrv_Log"
     elementFormDefault="qualified"
     attributeFormDefault="unqualified">
    <element name="WriteTrace_Request" type="tns:WriteTraceType"/>
    <complexType name="MonitorType">
        <sequence>
            <element name="ProcessGroup" type="string"/>
            <element name="ProcessName" type="string"/>
            <element name="OpName" type="string"/>
            <element name="Domain" type="string"/>
            <element name="TraceType">
                <simpleType>
                    <restriction base="string">
                        <enumeration value="Debug"/>
                        <enumeration value="Info"/>
                        <enumeration value="Warning"/>
                        <enumeration value="Error"/>
                        <enumeration value="Critical"/>
                    </restriction>
                </simpleType>
            </element>
            <element name="TraceDateTime" type="tns:string"/>
            <element name="PatientID" type="string" minOccurs="0"/>
            <element name="MessageDateTime" type="tns:string" minOccurs="0"/>
            <element name="ApplicationCode" type="string" minOccurs="0"/>
            <element name="SrcMessageID" type="string" minOccurs="0"/>
            <element name="ProcessID" type="string" minOccurs="0"/>
            <element name="OpID" type="string" minOccurs="0"/>
            <element name="OpParentID" type="string" minOccurs="0"/>
            <element name="HostName" type="string"/>
            <any namespace="##any" processContents="skip" minOccurs="0" maxOccurs="unbounded"/>
        </sequence>
    </complexType>
    <complexType name="MessageKeyDataType">
        <sequence>
            <element name="KeyValueData" maxOccurs="unbounded">
                <complexType>
                    <sequence>
                        <element name="DataFieldType" type="string"/>
                        <element name="DataFieldValue" type="string"/>
                    </sequence>
                </complexType>
            </element>
        </sequence>
    </complexType>
    <complexType name="ExceptionType">
        <sequence>
            <element name="ProcessID" type="string"/>
            <element name="Class" type="string"/>
            <element name="ProcessStack" type="string"/>
            <element name="MsgCode" type="string"/>
            <element name="Msg" type="string"/>
            <element name="StackTrace" type="string" minOccurs="0"/>
            <element name="Data" minOccurs="0">
                <complexType>
                    <sequence>
                        <any namespace="##any" processContents="skip" minOccurs="0"/>
                    </sequence>
                </complexType>
            </element>
        </sequence>
    </complexType>
    <complexType name="WriteTraceType">
        <sequence>
            <element name="Monitor" type="tns:MonitorType" nillable="true"/>
            <element name="MessageKeyData" type="tns:MessageKeyDataType" nillable="true" minOccurs="0"/>
            <element name="Exception" type="tns:ExceptionType" nillable="true" minOccurs="0"/>
        </sequence>
    </complexType>
    <element name="Monitor" type="tns:MonitorType"/>
    <element name="MessageKeyData" type="tns:MessageKeyDataType"/>
    <element name="Exception" type="tns:ExceptionType"/>
    <simpleType name="string">
        <restriction base="string"/>
    </simpleType>
    <simpleType name="anySimpleType">
        <restriction base="string"/>
    </simpleType>
</schema>


Take notice on:

After HostName element, any element can be placed.
Elasticsearch allows to insert fields which are not included in mapping.
For instance:
  <HostName>Machine1</HostName>
  <NewElem>Hi</NewElem>
  <Another>Again</Another>

Develop BW process 

 Take a look at the whole process:


First step is to map to the xsd created above.
It's important to make sure each datetime field is converted to UTC time.
Here is the mapping I've used:


Second, render from xml to JSON is easy using the plugin.
In addition, I found "Remove root" option very useful.


Here is an example at runtime after rendering to JSON:


Last step is to invoke REST API using POST method.

Convert JSON string (render output) to base64 and place it in "binary" node "content" element.


That's it! 

All that's left to do is to call this process asynchronously (you surely do NOT want traces to disturb your processes) and bomb elastic search with docs!
Don't forget to use kibana to create nice dashboards for maintenance.

Thank you Blogger, hello Medium

Hey guys, I've been writing in Blogger for almost 10 years this is a time to move on. I'm happy to announce my new blog at Med...