Sunday, January 21, 2018

Angular - Communication between components (Global notifications service)

Hi,

This post would focus on this case scenario:
An angular app has components which doesn't have a strong connection but still needs to communicate.
For instance, look at this app architecture:


How the heck does component E can shout something to B and F or even make them trigger some actions?

1. Global Notifications Service


This solution is based on rxjs Subject.

Relevant notes about subjects:
1. Subject class implements both Observer and Observable interfaces which means senders & receivers shares the same subject instance. Subject is kind of a channel.

2. Unlike an Observable which can have only one observer (subscriber) - Subject has state and actually keeps a list of observers (Read more at: https://medium.com/@benlesh/on-the-subject-of-subjects-in-rxjs-2b08b7198b93). 

3. next function - Sends message to the channel.
subscribe function - Registers a handler function which executes after a message received.
unsubscribe function - Unregister current subscriber.

4. In this sample a regular Subject is used which means it's very important to subscribe before next is executed (Read more at: https://stackoverflow.com/questions/36814995/rxjs-multiple-subscriptions-to-observable).

5. Always remember to unsubscribe & do not subscribe (accidentally) more than once.

Plunker explanation

Here is a brief on what's going on between these app components:

  • Second & Third component subscribed to First component messages (subscription is taken place in the constructor).
  • Third component subscribed to Fourth component messages.
  • Third component has an option to unsubscribe from First component messages and an option to subscribe again.


@Injectable()
export class GlobalNotifications {
  private nameToSubject: Map<string, Subject> = new Map<string, Subject>();

This solution is based on Map type (key-value store). nameToValue key represents the notification name (= channel name) and value is the subject created for it.

getSubject(name: any) : Subject {
    let subjectObj : Subject = this.nameToSubject.get(name);
    if(!subjectObj) {
      subjectObj = new Subject();
      this.nameToSubject.set(name,subjectObj);
    }
    
    return subjectObj;
  }

getSubject simply returns a subject by name from this store. If a subject doesn't exist - this method would also create one.

export class SecondComponent implements OnDestroy {
    private dataReceived : Array<string> = [];
    private subscriberFirst : Subscriber;
    
  constructor(private _globalNot:GlobalNotifications) {
    this.subscriberFirst = this._globalNot.getSubject('firstToSubs').subscribe((val) => this.dataReceived.push(val));
  }

Second component gets GlobalNotifications service instance from angular injector.
It executes getSubject with a relevant channel name ('firstToSubs'), gets the desired Subject instance and subscribes to its messages with a method.
subscribe method returns Subscriber instance which is important to save as a class member as it would be used to unsubscribe.


ngOnDestroy() {
    this.subscriberFirst.unsubscribe();
  }

In most cases - when a component destroyed it's implies that unsubscribe is required. You DON'T want to a subscriptions hell.


export class FirstComponent {
  constructor(private _globalNot:GlobalNotifications) {
  }
  
  onClick() {
  let subjectObj : Subject = this._globalNot.getSubject('firstToSubs');
   subjectObj.next("Sent from First Component");
  }
}

First component sends messages over 'firstToSubs' subject by getting its instance (getSubject) and using next method on it.

If you would click the Second component Unsubscribe from first button, First component messages would arrive only to the Fourth component.

Notes:

1. This post isn't just about sharing data (or just sending messages). It's possible to use it in order to trigger different methods on different components when something occurs.

2. This solution offers an async one-way invoke with no response. In order to response back to caller - another subject has to be defined.

3. If an app uses ngrx\store library - it's possible to use store as a similar solution (https://auth0.com/blog/managing-state-in-angular-with-ngrx-store/).
Plunker: https://embed.plnkr.co/cr4rCJ0hRVMwuLzKe4mg/

2. Bubbling events and using ngOnChanges


This solution uses an event that bubbles from a child to parent. Parent notifies children by changing an @Input property.

Plunker explanation

  • First component sends message to Second component

@Component({
  selector: 'first-component',
  template: '<h1>First Component (Sender)</h1><button (click)="onClick()">Send to components</button>'
})
export class FirstComponent {
@Output('messageSent') messageSent = new EventEmitter<string>();
  
  onClick() {
    this.messageSent.emit("Sent from First Component");
  }
}

First component is extremely simple. onClick simply emits a message (component output).

Note: it's impossible to use @Output or EventEmitter inside a typescript class or service.
In this case, this Observer & Observable pattern can be used: https://embed.plnkr.co/eDDlFsMfWYcP24RFOKtA/


@Component({
  selector: 'my-app',
  template: `
    <first-component (messageSent)="onMessageSentFromFirst($event)"></first-component>
    <br/>
    <second-component [dataReceived]="messages" [isChanged]="isChanged"></second-component>
    <br/>
  `,
})
export class App {
  public messages:any = [];
  private isChanged:boolean;
  
  public onMessageSentFromFirst(event : any) {
    this.messages.push(event);
    this.isChanged = !this.isChanged;
  }
}

App component is First and Second components parent and here is how data flows:
1. (messageSent) is the event fired from first-component - onMessageSentFromFirst is triggered.
2. Inside onMessageSentFromFirst the message (event) is pushed into messages array.
3. messages array is assigned to [dataReceived] (an input of second-component).
4. isChanged is used to notify second-component a change has been made to messages array.

@Component({
  selector: 'second-component',
  template: '<h1>Second Component (Receiver)</h1><div *ngFor="let data of dataReceived">{{data}}</div>'
})
export class SecondComponent {
  @Input()
    private dataReceived : Array<string>;
    private dataReceivedLength = 0;
    @Input()
    public isChanged:boolean;

  
  ngOnChanges(data:any) {
    if(data.isChanged) {
      this.onMessageReceived(this.dataReceived[this.dataReceived.length-1]);
    }  
  }
  
  ngDoCheck() {
    if(this.dataReceived.length != this.dataReceivedLength) {
      this.dataReceivedLength = this.dataReceived.length;
      this.onMessageReceived(this.dataReceived[this.dataReceived.length-1]);
    }
  }
  
  public onMessageReceived(message : string) {
   // Perform actions
  }
}

Second component always displays dataReceived array content.

There are two ways to trigger a change in dataReceived array:
1. ngOnChanges triggers only when an input reference is changed. In this case, dataReceived array reference stays exactly as before (just with one more item added to the array). By adding another boolean @Input (isChanged) App component notify a change has been made and ngOnChanges gets triggered.

2. By using ngDoCheck it's possible to check for change without the need of outer intervention. Simply by compare previous and current dataReceived length. On performance matters, ngDoCheck gets called in a very high-frequency so it should be efficient.

Notes:

1. dataReceived reference equals to the messages reference sent from app component - that means any change in it would affect both arrays.

2. Parent can also notify child by grabbing it's instance (using @ViewChild) and invoke one of his public methods.
For more: https://angular-2-training-book.rangle.io/handout/advanced-components/access_child_components.html

3. emit default is synchronous invocation.

3. Connect components via service for a regular request-response (synchronous) invocation


This solution uses a service to expose one component to another.

Plunker explanation


interface IReceiver {
  receiveMessage: (message:string) => string
};

To avoid tight-coupling - service would a reference to IReceiver (a reference to a component which would receive a message).


@Injectable()
export class Communicator {
  public receiver : IReceiver;
  
}

Service just holds a reference.
This could be a general service that holds several references by using a map structure (similar to the service presented in the first solution presented in this post).


export class SecondComponent implements IReceiver {
  private message: string;
  
  constructor(private _communicator:Communicator) {
    _communicator.receiver = this;
  }

  public receiveMessage(message:string) : string {
    this.message = message;
    return message + " Received";
  }
}

Second component implements IReceiver and registers as a receiver in the constructor.


export class FirstComponent implements OnInit {
  message: string;
  status: string;
  
  constructor(private _communicator:Communicator) {
  }
  
  onClick() {
    this.status = this._communicator.receiver.receiveMessage(this.message);
  }
}

First component easily invokes receiveMessage method synchronically and receives an immediate response.

Summary


This post presents various ways in order to communicate between siblings components.
Choosing which one to use depends on case scenario.
For instance: If two siblings are hierarchically far from each other - using the second method can be pretty annoying (you would have to bubble up the event again and again and then sink it many levels down).

For more helpful information visit Angular official site:

Thursday, August 10, 2017

Angular - Numbers only input (or Regex input)

Hi,
In this post we'll learn how to enforce some kind of behavior on input by using Angular core.

Our goal: 
Create an input which can get only numbers (or empty value). 
If any character other than a number is typed - input should not be updated!

Here is how angular performs when using an input:


1 + 2 - Anonymous function inside registerOnChange (1) sent to fn which is set to onChange (2).

3 + 4 - input event handler is defined to handleInput which just executes onChange.


Directive:


It's possible to solve the issue by writing a behavior directive.
This directive gets angular defaultValueAccessor from injector and override onChange so it won't trigger fn immediately - only after it validates input value.

Step-by-step explanation of app.ts :


@Directive({ selector: '[ngModel][numbersOnlyInput]'})

In order to use this directive - an html DOM element should have ngModel and numbersOnlyInput attributes.


constructor(private valueAccessor: DefaultValueAccessor, private model: NgModel) 

Constructor gets 2 references from Angular's injector: 
DefaultValueAccessor - which is actually Angular default wrapper that write and listen to changes of some form elements (https://angular.io/api/forms/DefaultValueAccessor).
NgModel - will be used in to extract and override the value in case it isn't valid.


valueAccessor.registerOnChange = (fn: (val: any) => void) => {  
valueAccessor.onChange = (val) => { } 

Overriding default onChange functionality.
Please note that actual change implementation should be written inside onChange method. Inside registerOnChange one should define the onChange method.


let regexp = new RegExp('\\d+(?:[\.]\\d{0,})?$'); 
let isNumber : boolean = regexp.test(val);
let isEmpty : boolean = val == '';

This is onChange implementation. val is the value that was now written to the input.
val is tested against a regex that enforces only numbers and isNumber gets the boolean result.
Input can also be empty - so val is also tested against an empty value and isEmpty gets the boolean result.


if(!isNumber && !isEmpty) {
   model.control.setValue(model.value);
   return;
}

return fn(val);

First, remember that onChange signature is (_: any) => {} which means that it's a function that gets a value of any type and returns a function.
- If val is not number and is not empty - model.value has the input value before something changed because input model hasn't updated yet.
model.control.setValue(model.value); sets previous input text into the input element. 
After setting the old value - change cycle is stopped so no function is returned to onChange.
- If val is a number or empty - change cycle continues regularly by return default fn with val.

Note: If this part isn't that clear - take a look again at the flow diagram above.


<input type="text" [(ngModel)]="val" numbersOnlyInput>

As mentioned, by writing ngModel and numbersOnlyInput - NumbersOnlyDirective is activated on input. 

Note: If you're using directives in your app - it's recommended to define each one on a separate file.

Custom Input Component:


Suppose you don't need that kind of functionality across all application and you need to write a custom input which behaves differently than Angular's input.

Step-by-step explanation of custom-input.ts:

export const CUSTOM_INPUT_CONTROL_VALUE_ACCESSOR: any = {
    provide: NG_VALUE_ACCESSOR,
    useExisting: forwardRef(() => CustomInputComponent),
    multi: true
};

NG_VALUE_ACCESSOR is an angular token which tells angular dependency injection (DI) core that this class implements ControlValueAccessor. Now Angular DI system can grab an instance of it. Using this token allows to use this input in a dynamic form as angular would recognize it as a form control (In this awesome custom form component blogpost refer to the paragraph that starts with "The beauty of this is that we never have to tell NgForm what our inputs are").


@Component({
    selector: 'custom-input',
    template: `<div class="form-group">
                    <label><ng-content></ng-content>
                        <input  (input)="handleInput($event.target)" 
                                (blur)="onBlur()" >
                    </label>
                </div>`,
    providers: [CUSTOM_INPUT_CONTROL_VALUE_ACCESSOR]
})

In contrast to the directive solution - now all events must be handled by custom-input implementation.


//From ControlValueAccessor interface
registerOnChange(fn: any) {
    this.onChangeCallback = fn;
}

onChange gets fn as is. fn is the same anonymous function from the diagram above. Overriding that function won't help like it did before. This is a new input (with a new ControlValueAccessor) which doesn't trigger onChange. The component's developer should state when or where to execute it.


handleInput(target: any): void {
    const val = target.value;
    let regexp = new RegExp('\\d+(?:[\.]\\d{0,})?$');
    let isNumber = regexp.test(val);
    let isEmpty = val == '';
    if(!isNumber && !isEmpty) {
       let model = this._inj.get(NgControl);  // get NgModel
       model.control.setValue(model.value);
       target.value = model.value;
       return;
        }
     
    this.onChangeCallback(val);
}

In this case, handleInput which has "numbers-only" input functionality decides if to trigger onChange
or not (continue change cycle or stop).

Saturday, July 1, 2017

Career path change - Full Stack Developer

Hi,

Since I started my career I mainly developed complex integration\ESB systems. 
I had a chance to work with many frameworks, products and tools:
.NET, BizTalk Server, TIBCO BW, EMS & MSMQ, SQL Server, Redis, ElasticSearch, SSIS, Reporting services and so on.

During those years I still managed to maintain some web knowledge with some ASP .NET and node.js programming. I also got to know little of Angular & React cool frameworks.

4 months ago i've decided to take a turn in my career path and began to work as a Full Stack Developer at Ayehu.
Our team develops SASS platform of EyeShare product which allows to create automation processes.

Besides working in a fun company along with great team members - I also have a chance to write client-side code in cutting-edge frameworks: 
- Angular4 & TypeScript
- HTML5
- SASS, CSS3

And some server-side:
- C# .Net
- T-SQL
- RabbitMQ

Wednesday, January 11, 2017

Continuous Integration – TIBCO BW & Jenkins and TFS

As mentioned in my previous posts, my team worked on a big project – migrate organization's offline interfaces from Microsoft Biztalk to TIBCO BW.
We decided to configure continuous integration using Jenkins in order to short and automate development process.

Main goal was:
A developer checks-in TIBCO BW project → Jenkins triggers the check-in → Validate project by "validateproject.exe" tool →Build a project ear file (used for deployment) by "buildear.exe" tool → Deploy project to development domain by "AppManage.exe" tool

First step – Install and Configure Jenkins

  1. Next thing is to log in with "admin" user name (Initial pass stored in: Jenkins\secrets\initialAdminPassword).

  1. From the left menu choose: Manage Jenkins → Manage Plugins
Please Install: Team Foundation Server Plug In, PowerShell Plug In
(You might need to install all their dependencies before).

  1. From the left menu choose: Manage Jenkins → Configure System
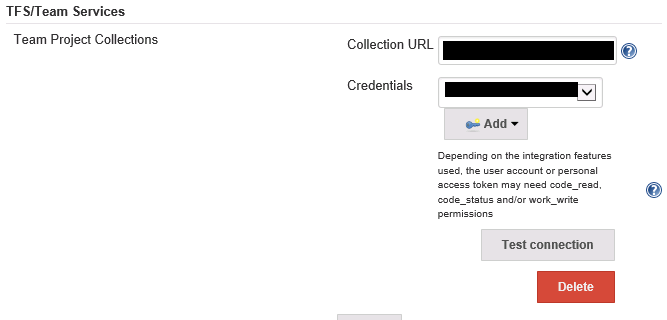
  1. Set TFS URL with relevant credentials. Test connection when done:


  1. Set Jenkins location and System Admin e-mail address. This address would appear in e-mail notifications as "From":
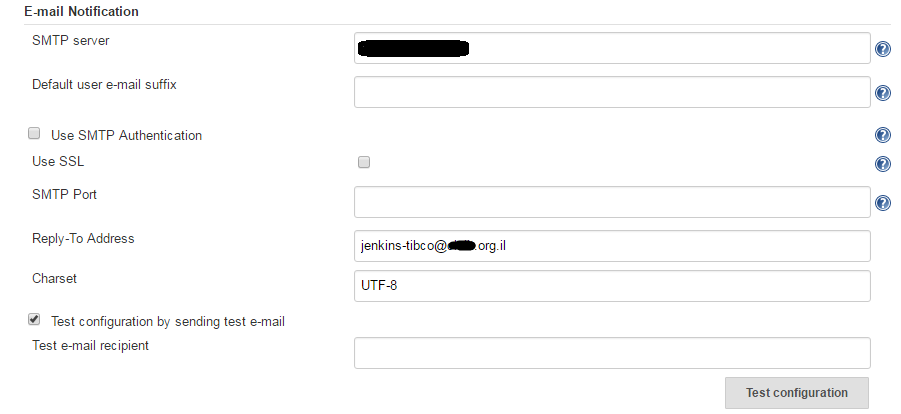
  1. Set SMTP Server and try to send a test e-mail:

Second step – Configure new items
  1. Click on Jenkins logo on top-left:

In this screen you would see all items configured (currently none).

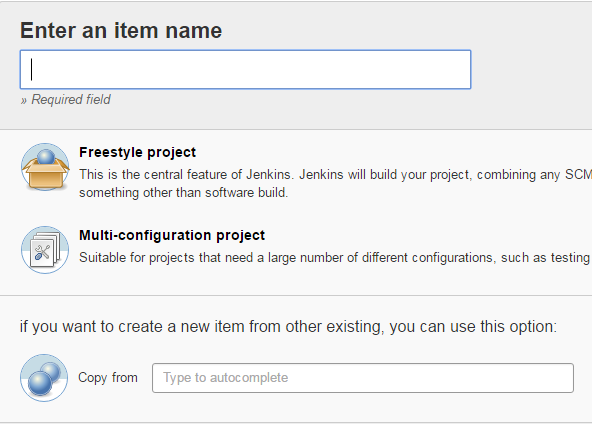
  1. Choose from the left menu New Item.
Type the item's name and choose Freestyle project.
It's also possible to create an exact copy from an existing item and after just modify configurations. This is VERY useful if you create many items which has almost the same configurations.

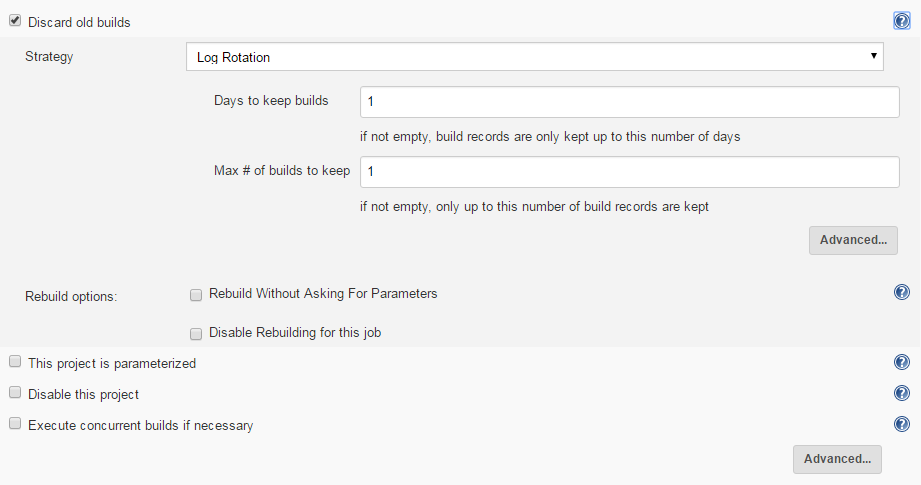
  1. In the item config screen you might want to check "Discard Old Builds" in order to keep just relevant content and to not overload storage.

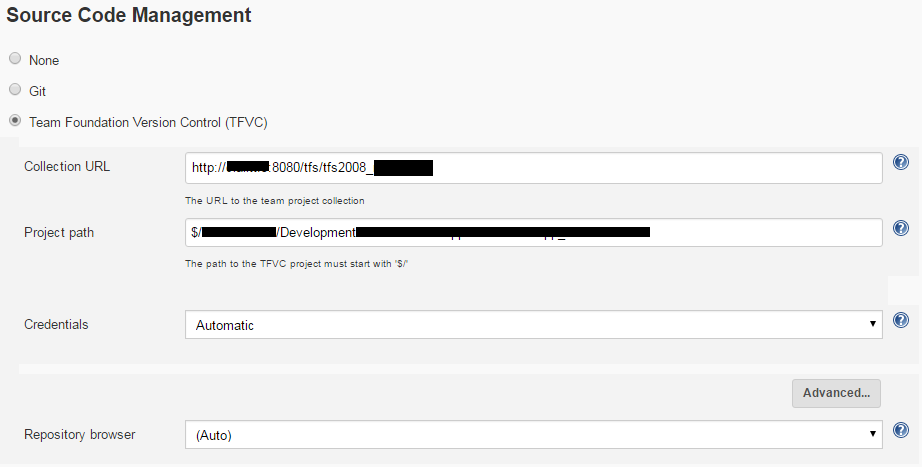
  1. Next thing is to configure which project the item would monitor.
Type Collection URL and path to project (starts with "$" sign. For instance: $/Development/Test_Project):


  1. It's possible to define many build triggers. We needed a simple trigger: once a developer checks-in a project.
Best way to achieve it is to mark: "Build when a changed is pushed to TFS/Team Services". Unfortunately, this option would work only since TFS 2015.
We picked "Poll SCM" and typed "H/5 * * * *" (poll for change every 5 minutes).

  1. Next is configuring build steps. You can add as many as you wish.
In this tutorial we would have 3 build steps for a tibco project:
  1. Validate project
  2. Create an ear file for deployment
  3. Deploy
  1. It's possible to configure many post-build actions. We just used the E-Mail notification to the team's mail:


Third step – Writing the build scripts: Validate, Build Ear, Deploy Ear

Tibco 5.13 offers 3 executables:
Validate project:
C:\tibco\designer\5.10\bin\validateproject.exe [arguments]

Build .ear file:
C:\tibco\tra\5.10\bin\buildear.exe [arguments]

Deploy .ear file:
C:\tibco\tra\5.10\bin\AppManage –upload –ear [arguments]

Each one produces an output which we needed to analyze with regex.
It's impossible to get only regex matches using Command-Line so we had to use PowerShell.

Project configuration would look like:


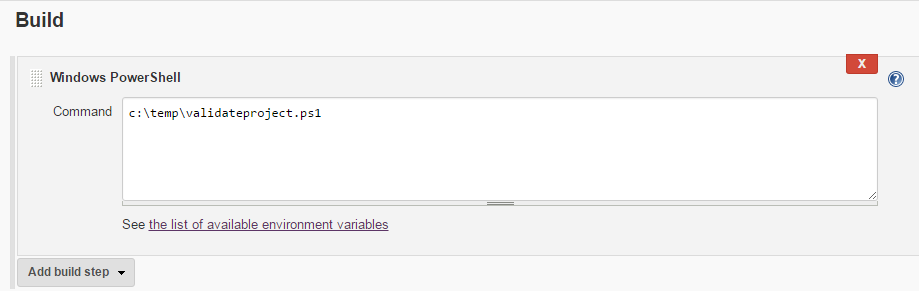
Build Step 1: Validate project
We've added a path to a powershell script in order to validate a project:

It's a good practice to keep the script in a file. This file is shared across all projects and any change in it would affect all immediately.
Let's take a look on this script content (please note the remarks):
# Sets current location to "validateproject.exe" folder
Set-Location "C:\tibco\designer\5.10\bin"

# Executes validateproject
# VERY IMPORTANT –  "-a" sets the alias library references. It's crucial for the #validation process
$tmp = .\validateproject.exe -a "C:\TibcoData\properties\FileAlias.properties" $ENV:WORKSPACE

# write output to console just for tracing
echo $tmp;

# This regex filters the number of errors
$regex = '[0-9]+ errors'
$output = select-string -InputObject $tmp -Pattern $regex -AllMatches | % {  $_.Matches } | % { $_.Value } | Out-String

# If regex output is NOT "0 errors" (that means that validation process has errors)
if($output -NotMatch "0 errors")
{
# exit code 10 (If it's not 0, then Jenkins would fail the build)
exit 10
}

Build Step 2: Build project ear file
Second step is to build project ear file which will be used for deployment in the next step.

# Sets current location to "buildear.exe" folder
Set-Location "C:\Tibco\tra\5.10\bin"

# Executes BuildEar
$tmp = .\buildear -a "C:\TibcoData\properties\FileAlias.properties" -x -v -s -ear ""/Deploy/$ENV:JOB_NAME.archive""  -o ""C:\TibcoData\ears\deployment\Jenkins\$ENV:JOB_NAME.ear"" -p ""$ENV:WORKSPACE""

# write output to console just for tracing
echo $tmp;

# Checks if "Ear created in:" (until line break) string is inside $tmp (output of buildear)
$regex = 'Ear created in:.*'
$output = select-string -InputObject $tmp -Pattern $regex -AllMatches | % {  $_.Matches } | % { $_.Value } | Out-String

# If output doesn't contain "Ear created in" then fail the build (exit code 10)
if($output -notlike "Ear created in:*")
{
exit 10
}

Build Step 3: Deploy project ear file
Last step is to deploy ear file to development domain.

# Sets current location to "AppManage.exe" folder
Set-Location "C:\tibco\tra\5.10\bin"

# Deploy ear to development domain
$tmp = .\AppManage -user "admin" -pw "admin" -domain "DEV_01" -app "$ENV:JOB_NAME" -upload -ear "C:\TibcoData\ears\deployment\Jenkins\$ENV:JOB_NAME.ear"

# Write deploy output to console
echo $tmp;

# Check if deployment finished successfully
$regex = 'Finished successfully in.*'
$output = select-string -InputObject $tmp -Pattern $regex -AllMatches | % {  $_.Matches } | % { $_.Value } | Out-String

# If output doesn't contain "Finished successfully in" then fail the build (exit code 10)
if($output -notlike "Finished successfully in*")
{
exit 10
}


Wednesday, December 28, 2016

Quickstart with Angular2

Hi all,

I've wrote a simple tic-tac-toe application using Angular2 framework.
I really think that angular framework brings a major positive change to client side development.


For those who makes their first steps with it, I recommend doing the heroes tutorial from Angular official site:
https://angular.io/docs/ts/latest/tutorial/


In my tic-tac-toe app I've used those angular2 functionalities:
- Two-Way binding
- Multiple Components
- Router
- Service
- Forms


Now i'm working to add some unit tests with Karma & Jasmine.

You can find the source code here:

Download or Clone it, hit "npm start" and have fun.

Monday, December 19, 2016

TIBCO Products - JMS vs. Rendezvous, Queue vs. Topic, Route vs. Bridge

Hi again,

When dealing with TIBCO products you can easily get confused by many related buzz words or methodologies.
I've decided to write a brief comprasion.


Rendezvous JMS  
Radio broadcaster Telephone Real-life example
Yes No Sending messages to all clients
No Yes Requires server
No Yes Persistence
No Yes Reliable messaging
Yes No High-Speed messaging
- Yes Clustering & Failover


Topic Queue  
Publish/Subscribe model Point-to-Point model Architecture
Multiple clients subscribe to the message Only one consumer gets the message Number of clients
No Yes Messages sent by order
No Yes Messages are processes only once
No Yes Destination is known
Yes No Consumer needs to be active
No Yes Consumer Acknowledgement


Bridge Route  
On the same server On different server Route messages to a queue
Yes  No Possible to have different type of source and destination
(For instance: queue to topic)
No Yes (Topic only) Can be transitive
  (a->b->c
means a->c)
Yes Yes (Topic only) Filters via selectors
Yes No Restart JMS server when config changes
- Single-Hop Hops allowed
bridges.conf routes.conf Config file 

Thank you Blogger, hello Medium

Hey guys, I've been writing in Blogger for almost 10 years this is a time to move on. I'm happy to announce my new blog at Med...